The complete CI/CD Setup (Part 1 - Overview)
In this series of blog posts I’ll describe how to setup on a small environment a complete Continuous Integration and Continuous Deployment pipeline, which components are required and how to deploy them and how to make this a bit more general for additional projects.
The Target Pipeline
At the end the pipeline should look like shown in the following sketch:
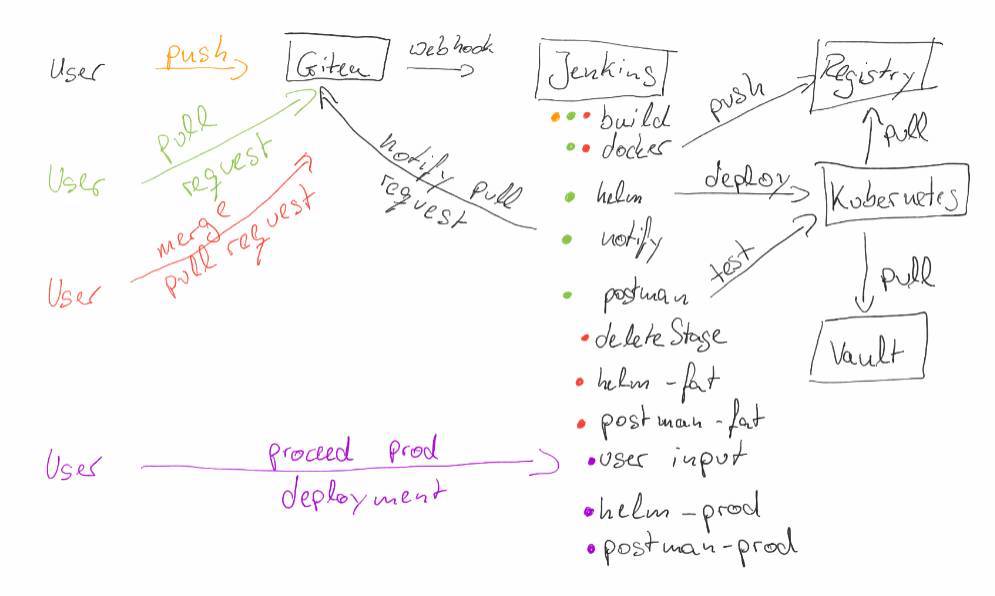
- A user pushes his source code changes to Git (Gitea). This change triggers a Continuous Integration pipeline running on Jenkins.
- When the user is happy with his change and the pipeline was successful he creates a pull request in Gitea. This pull request triggers again a Continuous Integration pipeline that runs again the build steps, but it also performs several additional steps:
- First it builds a Docker image that contains the source code changes and
- deploys this change to an ephemeral stage on Kubernetes.
- After the deployment is finished a message is written to the pull request to notify that now there is an ephemeral stage available with the source code changes.
- Now additional postman tests are executed to check that the api is still valid.
- After additional developers have reviewed the pull request and accepted the change, it will be merged via Gitea to master branch. This will trigger two Jenkins jobs. The first one will simply delete the ephemeral stage that was generated by the pull request. The second one will run:
- a pipeline that will run again the build and
- also the Docker job to build the required Docker image.
- After this a deployment to a staging environment (in this case FAT) will happen automatically and
- the postman tests are executed again.
- To propagate the change to Production (prod) the user is prompted in Jenkins to proceed the prod deployment. If he accepts this, the deployment will take place on prod and the postman tests will be performed on it again.
Why I’m developing this by my own?
There are several already existing solutions that allow such a setup (Jenkins-X, Gitab auto devops etc.). So why I made the descision to develop this setup by my own and not to use a “Clicki bunti” (clicking colerful) tool:
- I have only a small server setup at home (Intel NUC with 32GB of RAM and 2TB of storage), each additional tool for CI / CD removes place for my applications, this for example is the reason why I made the descision not to use Gitlab auto devops. It installs several tools and requires much resources. Gitea on the other side is only a small Go application that has a Github like look and feel.
- Jenkins-X for example has an interresting setup, but it seems not to run very well without Github and the integration with Gitea is still not ready yet. For me it was also very important to have a general setup that I understand and I’m able to extend.
- Yes I know, I use the old Jenkins, yes it is not cloud native and it is so old and was made before I wrote my first lines of code. But it works!! (a little fan boy) and the plugin architecture allows you to run the agents on Kubernetes as containers that are killed after jobs are finished.
- There are also tools like drone.io, but I spend some time in developing a simple CI/CD pipeline and it took me so much time of my live.
Used components
In this blog post series, I’ll also describe how to deploy the required components to setup such a pipeline. In the following few lines the tools are described:
- HashiCorp Vault is a secret store, that I’ll use to share secrets stored in Vault with Kubernetes.
- For application management I’ll use Helm and all the following described components will be deployed as Helm charts. I’m not such a big fan of Helm, because it uses a component deployed in Kubernetes called Tiller. It requires full Kubernetes access and the correct and secure setup is not done out of the box.
- As described I’ll sync secrets stored in Vault with a small Open Source software I’ve developed called Vault-CRD. Each time a secret changes in Vault the secret will also be updated in Kubernetes. One big problem of todays Kubernetes deployments is how to save secrets like APIKeys or Database credentials in your Kubernetes Manifest files stored in GIT. There are tools available that for example store them encrypted in GIT or try to run an init container that loads the secrets from a secure location. The idea of Vault-CRD is to make this approach easier and prevent your applications from directly accessing HashiCorp Vault.
- To allow users to access the deployed applications I’ll deploy also an Ingress Controller that automatically forwards traffic to the applications and also handles SSL Termination.
- What about storage? Most of the described components need persistent volumes to store their states. To enable this I’ll use ROOK a Cloud Native Computing Foundation incubator project.
- As already described I’ll use Gitea as Git service. It is very lightweight, looks very similar to Github and has a really good integration into Jenkins.
- To do Continuous Integration and Continuous Deployment I’ll use Jenkins and the gitea-plugin. This will automatically scrape projects stored in Gitea and searches for Jenkinsfiles to execute.
- As Hub for Docker Images I’ll use the registry v2 developed by Docker itself.
Target architecture of Components
I’ll deploy all the described components except HashiCorp Vault on Kubernetes. The reason why I made the descision to not deploy Vault itself on Kubernetes is, that I use Vault also to authenticate and authorize on Kubernetes. Therefore please have a look at one of my previous Blog posts that describe how to setup such an authentication and authorization behavior and also a blog post that describes how to secure Kubernetes via Vault.
To make the components available in my local network I’ve configured my DNS provider (Cloudflare) to point a Wildcard Subdomain to my Kubernetes Cluster:
*.home.koudingspawn.de IN A worker-ip-1
*.home.koudingspawn.de IN A worker-ip-2
*.home.koudingspawn.de IN A worker-ip-3
To handle SSL Termination I generated a wildcard SSL certificate manually with Let’s encrypt that is DNS validated (as local network ips are not checkable via path based challenge). In one of my posts I’ll also describe how to renew the certificate automatically via Jenkins.
$ mkdir conf
$ mkdir workspace
$ cat <<EOF > conf/user.ini
dns_cloudflare_email = changed-mail@test.domain
dns_cloudflare_api_key = my-api-key
EOF

$ docker run --rm \
  -v $PWD/conf:/etc/letsencrypt \
  -v $PWD/workspace:/var/lib/letsencrypt
  \ certbot/dns-cloudflare:latest
    certonly -n --agree-tos --email changed-mail@test.domain --dns-cloudflare --dns-cloudflare-credentials /etc/letsencrypt/user.ini -d *.home.koudingspawn.de