Make Kubernetes more secure with HashiCorp Vault
At the beginning of February 2019 I was allowed to give a talk at KubeCologne about how to make Kubernetes more secure with HashiCorp Vault. This post is an additional post to describe the parts of my presentation.
The idea behind the talk is to find ways to make the three main parts of Kubernetes more secure:
- Client access to Kubernetes API
- Communication inside the Cluster between the different components (e.g. Kube-Proxy, Kubelet, …)
- Communication from inside the Cluster to retrive secrets
Client access to Kubernetes API
About the first part I already wrote a Blog post that described how to use a PKI in Vault to generate short living Certificates. In a typical scenario one of your colleagues leaves the company, but he has access to a long living Certificate to access Kubernetes, maybe he has also admin access. What could you do to disable his access to Kubernetes? Maybe you could rotate the certificates inside the Cluster and replace them with new one? You could make his certificate invalid by writing it to a certificate revocation list?
All these solutions are not practicable, let alone available at all. And a more worst case scenario, what if an unauthorized user gets access to a certificate?
Therefore it is a good idea to use more short living certificates, that maybe have a TTL of 2h or less. And to audit the issuing and access via logs. This can also be done by policies, so if one user has access when he is member of the Team then he can simply lose the priviledge to generate certificates when he leaves the Team. All the described scenarios are covered by using HashiCorp Vault as a central PKI. The post I already mentioned is about how to use the Kubeadm certificate chain to generate such short living certificates.
Generate a certificate chain for more security
If you are setting up Kubernetes Cluster by your own, like in Kubernetes the Hard Way by Kelsey Hightower you can get started with your own certificate Chain from scratch. In such a case you would generate the root certificate offline and only generate a Certificate Signing Request in Vault. Then you could sign the Signing Request and upload the certificate to HashiCorp Vault. This will reduce the attack vectors because the root certificate is offline and only an intermediate certificate is used to generate new certificates. And in case of an attack you can revoke the intermediate and get started by generating a new intermediate certificate.
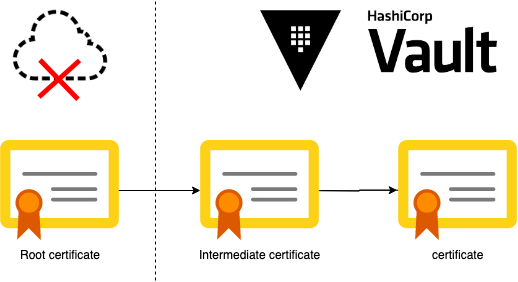
Here you can see how to generate a root certificate and an intermediate certificate that is signed via Certificate Signing Request:
cat <<EOF >ca-csr.json
{
  "CN": "Kubernetes CA",
  "key": {
    "algo": "rsa",
    "size": 4096
  },
  "ca": {
    "expiry": "87600h"
  },
  "names": [
    {
      "C": "DE",
      "L": "Wesel",
      "O": "Kubernetes",
      "OU": "CA",
      "ST": "NW"
    }
  ]
}
EOF

cfssl gencert -initca ca-csr.json | cfssljson -bare ca
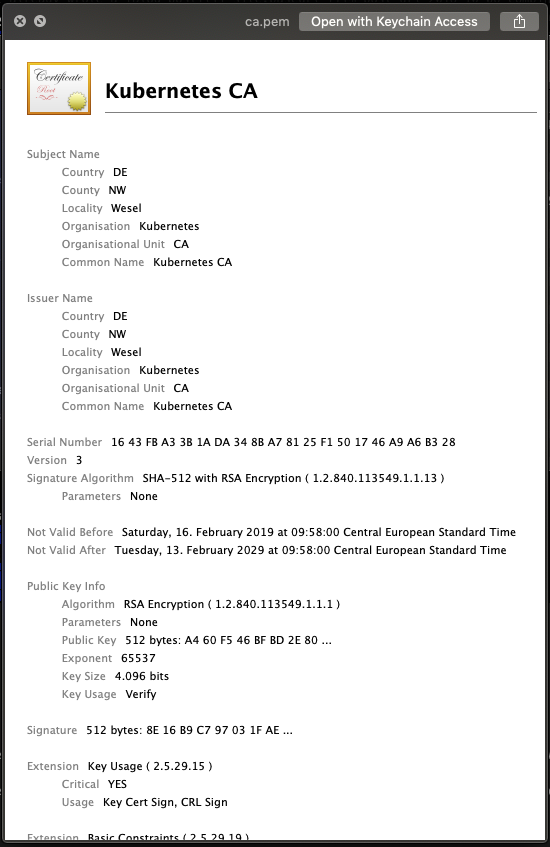
This will generate the root certificate with a lifetime of ~10 years. If the root certificate will be only available offline and in a secure place it is okay to have such a long lifetime. At the file system you can now see the two main files that are relevant here.
- ca-key.pem: This one is the root certificate private key. As private key already says, hold it private and secure.
- ca.pem: This one is the root certificate. It is the public part of the pair and will be used to validate intermediate certificates. It is typically bundled with the intermediates.
Here you can see the values of the generated root certificate:
With this root certificate we can now get started to generate an intermediate certificate.
vault secrets enable pki
vault secrets tune -max-lease-ttl=8760h pki
vault write -field=csr pki/intermediate/generate/internal common_name="Kubernetes Intermediate Authority" key_type=rsa key_bits=4096 ttl=43800h > intermediate.csr

cat <<EOF >intermediate.json
{
  "signing": {
    "default": {
      "usages": ["digital signature","cert sign","crl sign","signing"],
      "expiry": "43800h",
      "is_ca": true
    }
  }
}
EOF
cfssl sign -ca ca.pem -ca-key ca-key.pem -config intermediate.json intermediate.csr | cfssljson -bare intermediate_ca

vault write pki/intermediate/set-signed certificate=@intermediate_ca.pem
L 1-3: The first step now is to enable the pki secret engine in Vault. After this the pki can be modified to allow only certificates to be generated with a max lifetime of one year (8760h). Then we generate a signing request in Vault for an intermediate certificate. This intermediate certificate should have a length of 4096 bit for rsa encryption and has a lifetime of 5 years (43800h). One of the interresting parts here is, the private key of the certificate is only available in Vault and we as users have no access to the key.
L 5-16: With cfssl we now can sign the intermediate signing request and allow it to be used for signing of other certificates. This will generate an intermediate_ca.pem, the signed certificate by our root certificate.
L 17: The last step is to upload this intermediate certificate to the Vault secret engine. Now we have an offline root certificate and an intermediate certificate in HashiCorp Vault that can be used to generate new certificates.
Communication inside the cluster between the components
After the intermediate certificate is now part of Vault we can look to the Communication inside the cluster. Each of the components in Kubernetes communicates via x509 Certificate authentication with the Kube-Apiserver. But how does authentication and authorization work in Kubernetes?
Authentication
To authenticate a component that tries to communicate with the Kube-Apiserver it does x509 based authentication. So the server then can validate that the certificate is signed by the root / intermediate certificate authority and can check that the certificate lifetime is not expired yet. Therefore the Kube-Apiserver knows the root certificate (–client-ca-file) and can validate against it.
Authorization
For authorization the Kube-Apiserver checks the common name and the organization flags of the client certificate. The common name is the username and the organization field is the group that is used in RBAC via (Cluster)RoleBinding and (Cluster)Role. Some of the Core Component Roles are already build-in the Kube-Apiserver. The following diagram shows the main organization and common name values that are required for authorization:
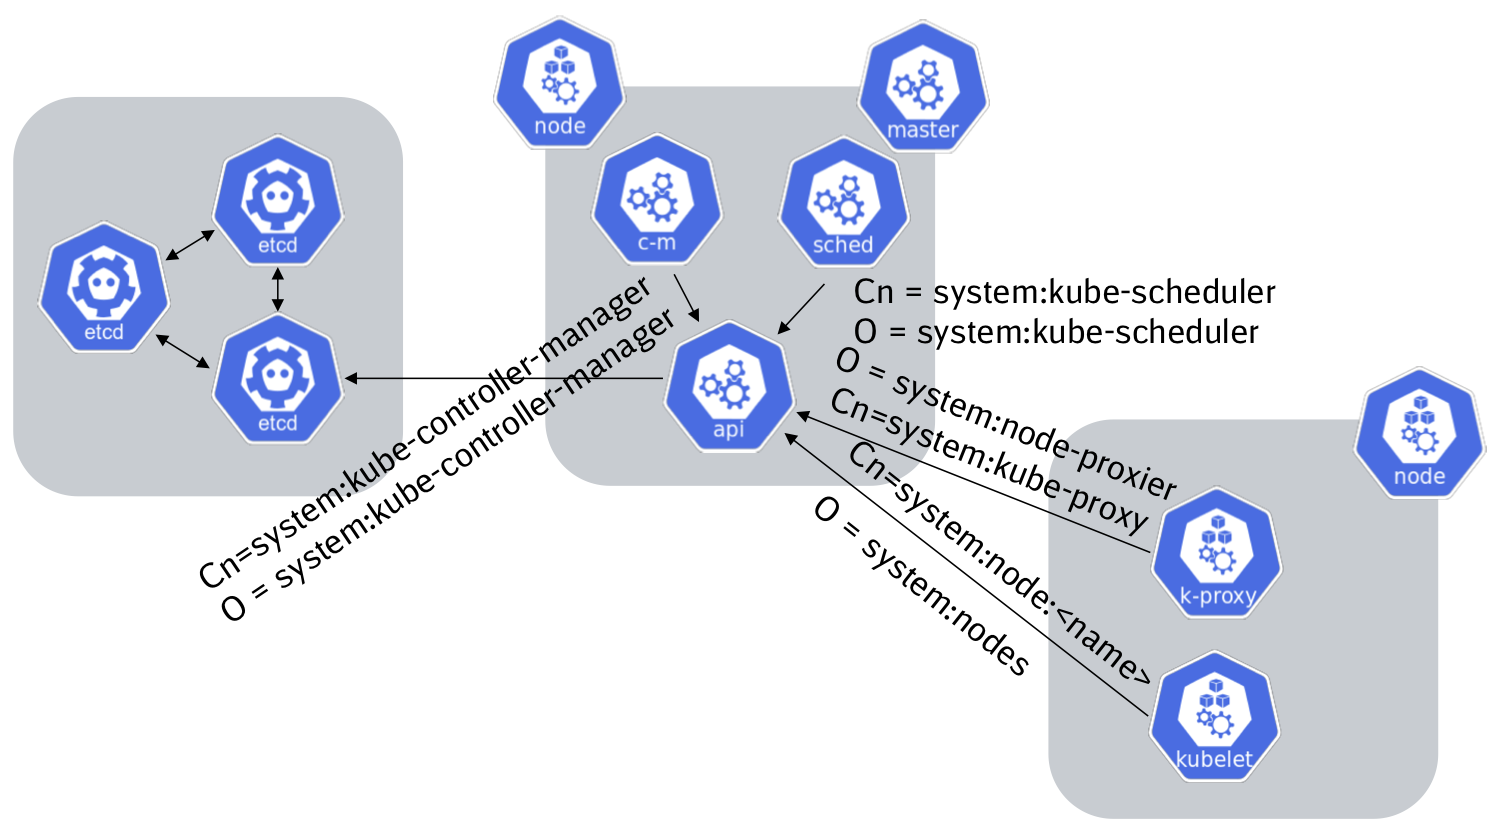
As you can see in the diagram there is a special thing how the kublet communicates with the Kube-Apiserver. Starting with version 1.7 of Kubernetes a new authorization concept was implemented a so called Node authorizer. The Node authorizer ensures that a Kubernetes Node can only access resources that are assigned to this node. To enable this authorization mode the admission-plugin NodeRestriction must be enabled and also the authorization-mode=Node must be set in the Kubernetes API-Server.
Instance start flow
When we now understand how the components communicate to each other, how do we put the certificates into our instances? We could put them into our Base Images for example via a packer Build. So each new Base Image build would rotate our certificates, but this means all our instances starting from the same Base Image start with the same certificate and if someone gets access to this instance he has complete access to the certificates. A better way is to use the authentication backends of HashiCorp Vault, this allows the instance to communicate directy with Vault to receive certificates that are also unique to this instance.
Vault supports authentication backends for the main Cloud provider (AWS, Azure, Google Cloud,…), therefore Vault uses the Metadata Services of the Cloud Provider that can generate a certificate or a JWToken that is unique for this instance and only the instance has access to. With this unique key the instance can communicate to Vault to receive a Vault Token.
 (https://www.vaultproject.io/docs/auth/aws.html)
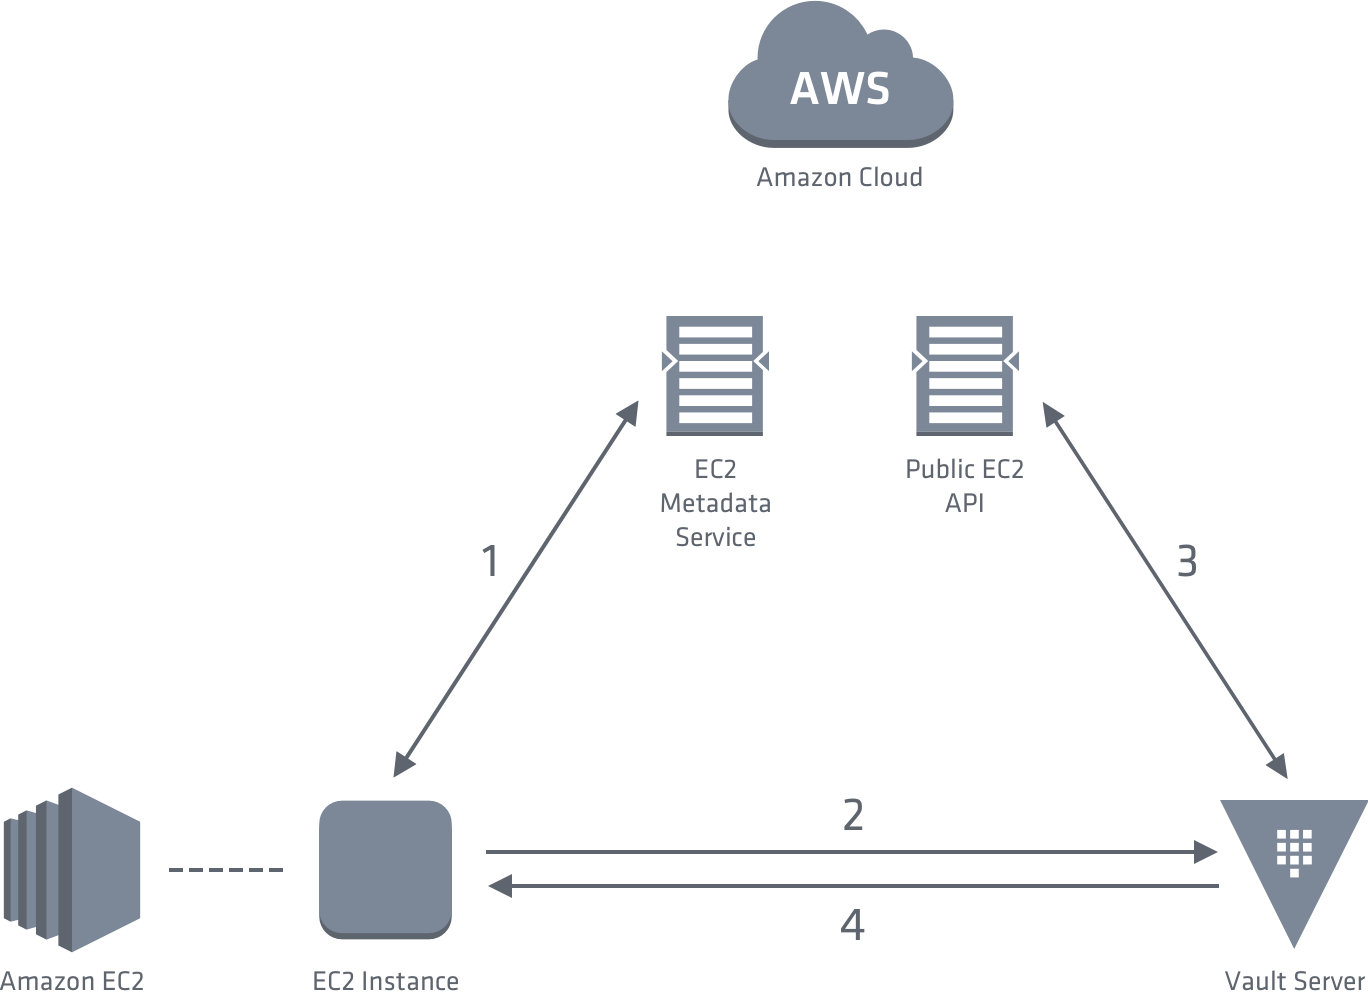
The diagram shows how the authentication works for AWS. First the Instance communicates to the Metadata Service to receive the PKCS7 certificate. Then it communicates to Vault and sends its PKCS7 certificate to receive a Vault Token. Vault validates the PKCS7 against the Public EC2 API and performs additional internal checks and then returns a Vault Token to the instance.
The following section describes how to do this (first please attach the required Instance Profile to Vault to allow it to communicate to the EC2 API). Therefore we first enable the AWS authentication backend and define an authentication role. To this authentication role we can now assign policies. So the instances that are authenticated against this role are allowed to use the assigned policies:
vault auth enable aws

vault write auth/aws/role/kubernetes-master \
  auth_type=ec2 \
  bound_ec2_instance_id=${instanceId} \
  policies=kubernetes-master \
  max_ttl=1h
In this example we are simply using an ec2 instance id, so only the instance with this id is allowed to authenticate against the role kubernetes-master. I know this is not useful for an autoscaling Group, for a short example I’ll ignore this. But there are other ways to describe which instances are allowed to authenticate against the role, e.g. instances in a specific VPC, Subnet or with a specific attached instance profile. Vault AWS Authentication API
The instanceId can be returned from the ec2 metadata service of this instance or from the Web Console.
ec2metadata --instance-id
After this the instance is now able to authenticate itself to Vault. Therefore the instance first loads the pkcs7 file, then it authenticates to Vault:
pkcs7=$(curl -s http://169.254.169.254/latest/dynamic/instance-identity/pkcs7 | tr -d '\n')
curl -X POST "https://vault.example.com/v1/auth/aws/login" -d "{\"role\":\"kubernetes-master\",\"pkcs7\":\"${pkcs7}\"}"
The response contains the client token, this is the Vault Token that must be provided for each request to Vault to receive secrets:
{
  "auth": {
    ...
    "client_token": "[Vault-Token]"
  },
  ...
}
With the part from Client access to Kubernetes API and the information about the required certificates for cluster internal communication it is now able to build a script or a short GO application that can be executed on System Startup to place the required certificates on the instance.
To make the Vault authentication via Cloud Provider more secure it is possible to forbid a renewal or regeneration of the Vault token and also specify a short live Time of the Vault Token (https://www.vaultproject.io/api/auth/aws/index.html#create-role). In addition the script should revoke the Vault Token after it is finished, then it is almost impossible to get access to Vault after the process has finished.
curl -X POST https://vault.example.com/v1/auth/token/revoke.self \
  -H "X-Vault-Token: ${VAULT_TOKEN}" \
  -d "{\"token\": \"${VAULT_TOKEN}\"}"
Communication from inside the Cluster to retrive secrets
To allow also Pods to communicate to Vault to receive for example dynamic Database credentials or get access to secrets Vault provides an authentication backend for Kubernetes. Therefore it uses service accounts that can be attached to Kubernetes. The process is similar to the Cloud Provider authentication process, in Kubernetes it simply uses the Service Account JWToken as a trustable authentication method:
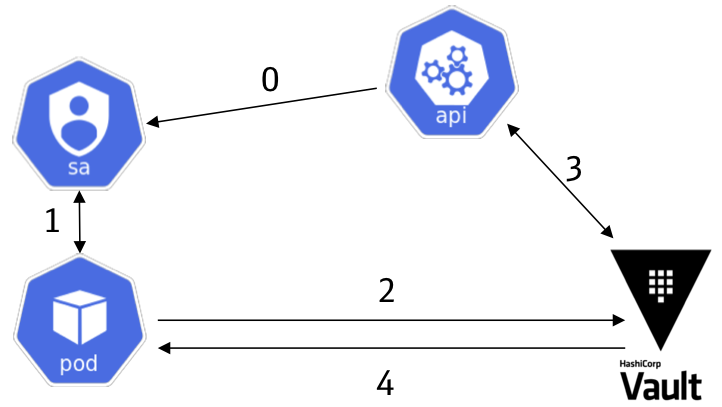
First the pod reads the JWToken of the Service Account from a specific file and then communicates to Vault to authenticate via a role (in this case vault-consumer, but you can define as many roles as you like).
token=$(cat /var/run/secrets/kubernetes.io/serviceaccount/token)
curl -X POST "https://vault.example.com/v1/auth/kubernetes/login" -d "{\"role\":\"vault-consumer\",\"jwt\":\"${token}\"}"
To validate the service account JWToken Vault communicates to the Kubernetes API and validates the JWToken. After this Vault returns the Vault Token, the response is similar to the AWS authentication example. With this Token the pod is now able to communicate to Vault to receive secrets.
curl "https://vault.example.com/v1/kv/simple-secret" \
    -H "X-Vault-Token: ${VAULT_TOKEN}"
To enable this authentication method Vault and also Kubernetes must be configured as follows:
- Kubernetes must be configured to allow Vault to validate the JWToken:
kubectl create sa vault-auth
cat <<EOF | kubectl apply -f -
apiVersion: rbac.authorization.k8s.io/v1beta1
kind: ClusterRoleBinding
metadata:
  name: role-tokenreview-binding
  namespace: default
roleRef:
  apiGroup: rbac.authorization.k8s.io
  kind: ClusterRole
  name: system:auth-delegator
subjects:
- kind: ServiceAccount
  name: vault-auth
  namespace: default
EOF
This will generate a secret named vault-auth-xxxx, this secret contains a JWToken and the root certificate used for signing all certificates inside the Cluster communication.
- These two components are now required to configure Vault to know how to validate Client requests:
jwToken=$(kubectl get secret ${secretName} -o json | jq '.data["token"]' -r | base64 -D)
kubectl get secret ${secretName} -o json | jq '.data["ca.crt"]' -r | base64 -D  > ca.crt

vault auth enable kubernetes
vault write auth/kubernetes/config \
    token_reviewer_jwt="${jwToken}" \
    kubernetes_host=https://${KUBERNETES_API_URL} \
    kubernetes_ca_cert=@ca.crt
Now we can configure a role to allow pods to get access to assigned policies:
vault write auth/kubernetes/role/vault-consumer \
    bound_service_account_names=vault-consumer \
    bound_service_account_namespaces=default \
    policies=simple-key-value \
    ttl=1h
In this example we allow pods that have access to the vault-consumer service account in the default namespace access to a policy called simple-key-value. When we now generate a service account and assign it to pods they are able to communicate to Vault as descirbed above:
kubectl create sa vault-consumer
kubectl run -i -t busybox --image=tutum/curl --restart=Never --serviceaccount=vault-consumer bash
Vault-CRD
I would like to mention my OpenSource Project Vault-CRD as well. The Project makes it easy to synchronize secrets that are stored in HashiCorp Vault with Kubernetes. So if a secret changes in HashiCorp Vault the Kubernetes secret would also be updated.
How to install Vault-CRD is described in the installation instructions, in this example I’ll simply show how to define a synchronization:
cat <<EOF | kubectl apply -f -
apiVersion: "koudingspawn.de/v1"
kind: Vault
metadata:
  name: test-secret
spec:
  type: "KEYVALUE"
  path: "kv/simple-secret"
EOF
If you apply this manifest you should see that the secret stored in HashiCorp Vault in the mountpoint kv as simple-secret is synchronized to Kubernetes. And if there is a change in Vault it will synchronize the change to Kubernetes.